
Applies to:
self-hosted AOAO OnBoard
This checklist takes a new self-hosted AO or AO OnBoard server from install to ready for your team. Work through it in order; each step links to the article with the details.
Who does what: your IT administrator runs the commands on the AO server, and an Admin adds people in AO. For steps 9 to 12, you prepare and Terradepth support makes the change: contact support@terradepth.com.
Checklist
- Network and firewall: allow the ports and hosts AO needs. See Firewall and allowlist quick reference.
- Install: copy the complete release folder to a new folder on the AO server and run
./install-upgrade-ao.shfrom it (older release folders:./install-containerized-ao-pd.sh --runtime docker). FollowCUSTOMER_INSTALL_GUIDE.md, the install guide in the release folder. The server needs Docker or Podman, an account that can use it, Python 3,flock, and the free disk space the guide lists. - First-time setup: on the AO server, run
./ao-mgr.sh initfrom the release folder. It sets up email, creates your first organization and its first Admin, and then asks how people will reach AO: over HTTPS, or HTTP only. For that last step it asks for your sudo password. Older releases skip the HTTPS question. Type email addresses in lower case, here and inorg,adminandcreate_user: an account created with capital letters can't sign in with a password. See Administering AO. - First sign-in: run
./ao-mgr.sh statusand check that every service is running. Then open the address you chose ininit, orhttp://<your AO server>:8888/, and sign in as that Admin. See Signing in and passwords. - Check the install: the installer checks AO's database and services before it finishes. If
./ao-mgr.sh helplistse2e-verify(older releases), also run./ao-mgr.sh e2e-seed,./ao-mgr.sh e2e-verifyand./ao-mgr.sh e2e-cleanup, in that order, as its install guide describes:e2e-verifymust pass before your team starts using AO. - Email: check that invitations and reset links arrive, or change the mail settings. See Set up email for invitations and password resets.
- HTTPS: choose it in
init, or later with./ao-mgr.sh tls setup, then make sure people's computers trust the certificate. Your own TLS proxy in front of AO also works. If./ao-mgr.sh helpdoesn't listtls, put AO behind your own TLS proxy or ask support@terradepth.com to set up HTTPS. See HTTPS in Administering AO and Network and firewall requirements. - Organizations, Admins, users and groups: add organizations and their Admins with
./ao-mgr.sh organd./ao-mgr.sh admin, then add people and groups in AO. See User Management. - Single sign-on: register AO with your identity provider and send support the details. See Set up single sign-on.
- Cloud mounts: prepare your storage, ask support to add the mount, then attach projects. See Add a cloud mount.
- External layers for everyone: send support the layers everyone should see. See External layers.
- Features: choose the features your organization needs, such as Remote Sync, and ask support to turn them on. See Features turned on per organization.
- Test with a first project: create a project, upload a file, visualize it and open it on the map. Follow the first project quick start.
- Backups: run
./ao-mgr.sh backup, and also back up AO's file storage or the whole server. See Administering AO.
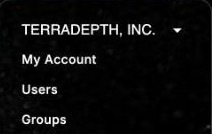
Step 8: Users and Groups are in the menu under your initial, in the top right corner.
For AO OnBoard, also see Setting up and powering AO OnBoard. On AO in the cloud or AO for government, Terradepth sets up your organization: start with User Management.
Related: Administering AO · Firewall and allowlist quick reference · Security in AO