
Besides files, you can get lists, pictures and positions out of AO: CSV reports of files or objects, a profile chart, a GeoTIFF image, a position and a mission file. To download files, see Moving Files In and Out of AO.
Files report (CSV)
- In the project's Files tab, select the files and folders to report on. A selected folder includes every file in it.
- Choose Report.
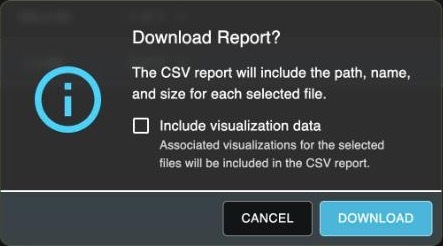
- In Download Report?, choose Download. To add the files' visualizations, first tick Include visualization data (shown when a selected file has visualizations).
The CSV, named after the project with the date and time, has a row per file with Path, Name and Size (bytes). With Include visualization data, a row per visualization follows its file, with Report Type (File or Visualization), Parent File, Visualization Type, Visualization Subtype, Status, EPSG, Vertical EPSG and Vertical Offset.
Anyone who can open the Files tab can download a report. If a file or folder name contains #, the report ends at that file, and a comma in a name moves the rest of that row one column over.
Objects list (CSV)
In the project's Objects tab, select the objects, then choose the report icon. AO downloads markers_report.csv:
| Column | What it holds |
|---|---|
| name | The object's name |
| lat, lon | Latitude and longitude in decimal degrees, whatever your position format |
| type | Pin or Polygon |
| comments | The object's notes |
| updatedBy, updatedAt | Who last changed it, and the date (MM/DD/YYYY) |
A polygon gives one position, its center. Values aren't in quotes, so a comma in a name or notes moves the rest of that row into the wrong columns. The list doesn't include Category or Source. See Objects.
Profile chart (image)
In the Surface Profile window, choose Export As..., then PNG or JPG. AO downloads profileChart.png or profileChart.jpg. It's a picture of the chart: the profile's heights don't export as numbers. See Map tools.
GeoTIFF of an area (image)
Right-click the map and choose Export GeoTIFF. Choose Select Region, drag over an area up to 10 km in any direction, then choose Export GeoTIFF. AO downloads ao-export-<date and time>.tif, a georeferenced color image of the top imagery, vector and grid layers there, without labels or markers.
The image holds colors, not depths or other data values. For values, download the visualized file itself. Steps in Map tools.
A position
Right-click the map and choose Copy Lat/Lon to Clipboard. AO copies the latitude, a space and the longitude, in the Position Units from your My Account settings, and shows Lat/Lon copied to clipboard! When you're zoomed far out, it copies fewer decimal places.
A mission file
In Mission Planner, Export mission downloads the mission as a .tdm file to load onto the vessel. See Mission Planner.
To share a view or a layer, see Sharing. To copy whole projects to another AO, see Remote Sync.
Availability: Export GeoTIFF and Mission Planner are turned on per organization. To use them, contact support@terradepth.com.
Related: Managing files in a project · Objects · Sharing